Objective
Like most board games, the objective of Hansa is to have the most points by the end of the game. Points come in two general categories: in-game points, which are scored while the game is being played; and, post-game points, which are scored after the game is over. In a typical game, most points are scored post-game.
The Playing Area
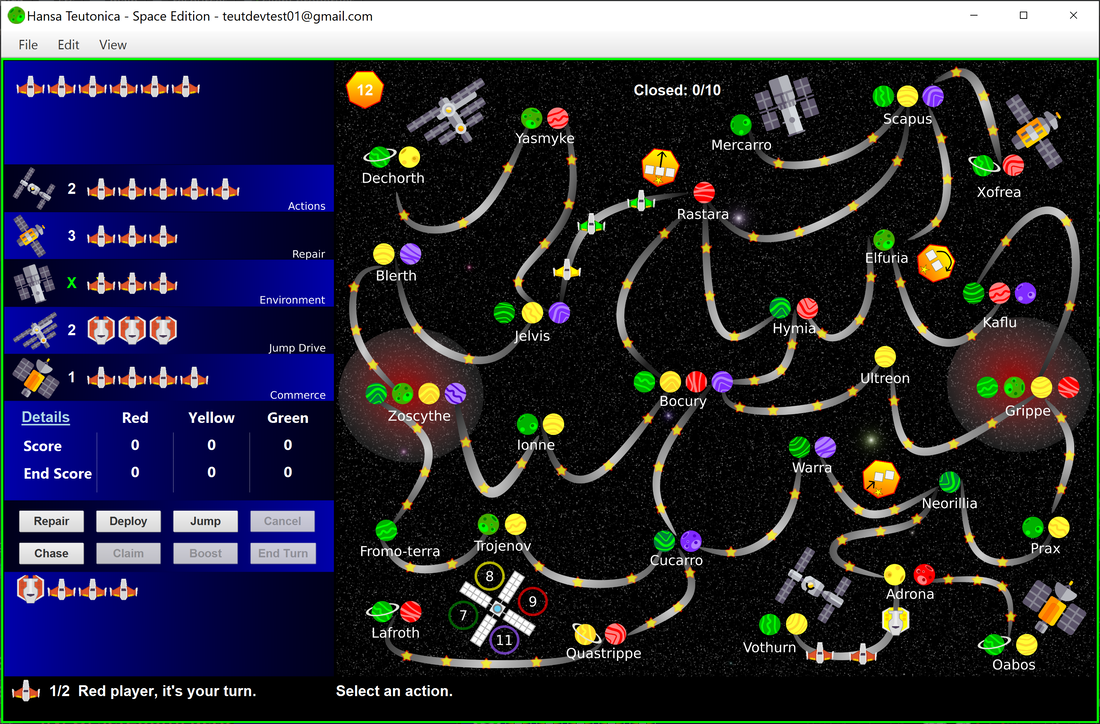
The player area is divide into two sections: the playing board, and each player's personal tableau. The playing board is where all of the interaction between players happens. Each player has a personal tableau to store their pieces when they are not in use, keep score, and keep track of technology advancements. The picture below shows a typical 3-player game in progress for the red player.
Flow of the Game
When the game starts each player is assigned a random player position. Player 1 is always red and goes first, 2 is yellow, 3, is green. If there are 4 or 5 players they are assigned blue and purple, respectively. On a players turn, they use all of their actions, and then play proceeds to the next player. If a game end condition is met at any time, the game ends immediately and final scores are calculated.
Pieces generally flow from the players ship yard (bottom of tableau), onto the playing board, and then back to the players junk yard (top of tableau). Occasionally, a player uses the Repair action to refill the ship yard from the junk yard.
Pieces generally flow from the players ship yard (bottom of tableau), onto the playing board, and then back to the players junk yard (top of tableau). Occasionally, a player uses the Repair action to refill the ship yard from the junk yard.
Playing Pieces

Each player receives 26 scouts and 4 cruisers of their player color. Boosters initially don't belong to players and are acquired during the course of the game.
Tableau
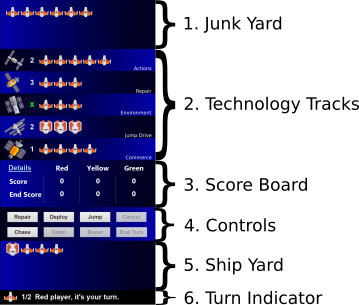
Each play has a private tableau which constitutes the left side of the playing area. Each players tableau is composed of 6 area which are described below.
1. Junk Yard. This is the area where ships (both scouts and cruisers) are stored after they are used. Thematically, they represent ships that are out of use and need repairs before they can be deployed again.
2. Technology Tracks. This area represents a player's capabilities. Each track is composed of a satellite image, a value, some number of ships, and the name of the technology. When a technology is improved, a ship is moved from a technology track into the ship yard, and the technology value may increase. The satellite image corresponds to a satellite on the playing board, which indicates where that technology can be improved (see also, the claim action).
2a. Actions Track. This track represents the number of actions a player may perform during a turn. All players begin with 2 actions. After a single improvement, 3 actions may be performed. It takes two more action track improvements to reach 4 actions, and an additional 2 improvements to reach 5 actions, which is the maximum. The progression is thus: 2, 3, 3, 4, 4, 5 actions.
2b. Repair Track. This track represents the number of ships that can be moved from the junk yard to the ship yard when the player takes the repair action. All players begin with 3 repairs, which can be applied to any combination of scouts and cruisers in the junk yard. After 1 improvement, the player can repair 5 ships; after 2 improvements, 7 ships; and after 3 improvements, all ships can be repaired during a single repair action. The progression is thus: 3, 5, 7, all ships.
2c. Environment Track. This track represents the range of extreme environments in which a ship may land to claim a planetary system. Each planet on the the playing board is color-coded to match the level of environmental technology necessary. Each player starts with an environmental technology level of green. After each technology improvement, they may progress to colonizing yellow, red, and eventually purple planets.
2d. Jump Drive Track. This track represents how many ships a player may move during a jump action. Jumping allows players to reposition several ships during a single action and essentially move them from less favorable to more favorable positions. Players start with a jump value of 2, and progress to 3, 4, and 5 ships with technology improvements. Unlike the other technologies which release scouts, improving the jump drive frees up a cruiser, which is better for blocking opponents (see also, the chase action).
2e. Commerce Track. This track represents how profitable trading is for the player as they build larger networks of colonized planets. At the end of the game, each colonized planet in the players largest network is counted as victory points toward the final score. Players start with a commerce value of 1, which means 1 victory point per planet in the network. After a single commerce technology improvement this value goes to 2; after two more improvements to 3; and after 4 improvement to 4. The progression is thus 2, 3, 3, 4 additional points per planet in the largest network. See the scoring section for more details on how games are scored.
3. Score Board. This area shows the scores for all players. Note: there are two scores for each player, a current "Score", and an "End Score." The current "Score" represent how many victory points each player has earned thus far. While the "End Score" is a projection of how many points the players may have when the game is over. The "End Score" allows each player to gauge who is ahead, given that much of the score is calculated by conditions that are met at the end of the game.
4. Controls. This area is enabled during a players turn. The player selects the action to perform and then drags and drops pieces to complete that action. The actions are: Repair, Deploy, Jump, Chase, Claim, and Boost. Each action type available is described in detail below. If the active player needs to end an action early, cancel an action, or explicitly end the current turn, they can also do that here.
5. Ship Yard. This is the area for storing ships that are ready to play. When a player selects the Deploy or Chase actions, ships from here are moved onto the playing board.
6. Turn Indicator. The turn indicator shows a ship for the color of the active player, the current action number, the maximum number of actions allowed this turn, and some hint text. When it's your turn, the game will play a sound, surround the entire playing area with a green border, and put your color of ship into the turn indicator area. There is no game timer as of yet, so, please, pay attention to these clues and take your turn in a timely fashion.
Playing Board

The image above shows many of the features used throughout the entire playing board.
1. Routes. Routes connect two planetary systems and provide positions for ships to rest before colonizing a planet or moving elsewhere on the playing board. Each route is marked with a broad white band and a number of stars that indicate how many ships can occupy the route. All positions on a route are considered to be equal. Meaning, there is no difference between a ship that is placed near to or far from a planetary system.
2. Nebula. Nebula are represented as a light, foggy red clouds around the Grippe and Zoscythe planetary systems. You can receive additional in-game victory points for colonizing any set of planets that connect the two nebula. More on that in the scoring section below.
3. Striped Planets. Striped planets are positions where a scout ship can land during the Claim action.
4. Cratered Planets. Cratered planets are position where a cruiser ship can land during the Claim action.
5. Satellite. Satellites are attached to 5 key planetary systems in the galaxy. These are places where during your Claim action, you can choose to improve a technology if you forego colonizing the planet.
6. Ringed Planets. Ringed planets score an extra in-game victory point when they are colonized. Ringed planets are colored just like other planets, indicating the level of environmental techology required to colonize them. Similarly, they are striped or cratered, indicating the type of ship that can colonize them.
7. Ships on Route. When a ship occupies a route, it is placed on top of a star on the route.
8. Booster on Route. When a booster is placed on a route, it is placed near the route with the small yellow start pointing toward the route.
Game Mechanics
On a player's turn, they select an action from the controls area, move their pieces to complete that action, and repeat until all of their actions are used. The bulk of the game is knowing what actions you can do, and how to use them to score the most victory points. The five actions you may perform are...
1. Repair. Move your ships (either scouts or cruisers or any combination thereof) from the junk yard to the ship yard. You can move as many pieces as the value of your repair technology track.
2. Deploy. Move one ship from your ship yard to any route on the playing board. There must be at least 1 free space on your destination route.
3. Jump. Move your ships from routes to other routes. You may move between 2 and 5 ships depending upon the value of your jump technology. If you would like to move fewer ships than your maximum, you may press the "End Early" button to cut your jump short.
4. Chase. Force another player's ship to leave it's position. If you displace another player's scout, you must pay a penalty of 1 ship by moving a ship from your ship yard to the junk yard. If you displace another player's cruiser, you must pay a 2 ship penalty by moving 2 ships from your ship yard to your junk yard. If you do not have enough ships to pay the penalty, you may not take this action. The other player is compensated for loss of position, after you pay your penalty, the other player will be given a chance to add ships to the playing board. The number of ships added is equal to the penalty you paid. The ships are then added back onto the playing board to the nearest available route. The distance to another route is calculated by counting the number of planetary system between routes. If there are many routes that are the nearest, as is usually the case, the player may add ships to any of the nearest routes. This sounds more complicated than it is, and the software will help you step through the chase action. Just follow the hint text that appears on the bottom of your playing area every step of the way.
5. Claim. To claim a route, you must first occupy all of the positions on that route. Once this is done, click the claim action, and then click on a ship on the route you would like to claim. Many things can be triggered when you claim a route. Let's go through them all.
5a. Colonize a Planet. Planets may be colonized if you have the right qualifications. To colonize, you leave a ship behind on the planet during the claim action. Other ships are returned to the junk yard. The software will pop up a dialog and ask you which planet to colonize if you are eligible to do so, but there are some things to know to better plan your colonization strategy. You can only colonize the left-most planet in a planetary system. You must have enough environmental technology to survive on the planet. Just match your environmental technology to the color of the planet to see if you qualify. Green planets require the green technology level, which everyone starts with. Yellow planets require yellow, and so on to red and purple. Your ship must also be qualified to land on the planet. Smooth striped planets are suitable for scout ships, while rocky cratered planets require a cruiser. Ringed planet grant you an extra victory point when you colonize them, and they can be any color and either striped or cratered.
5b. Improving a Technology. If there is a satellite next to a planetary system which is adjacent to the route being claimed, the player may choose to not colonize a planet, and instead, improve the corresponding technology. Any given satellite is only capable of improving one particular technology. The satellite next to Vothurn, can only improve the actions technology track. The satellite next to Oabos can only improve the commerce track. Xofrea improves repair. Mercarro improves environment. And, Dechorth improves jump drive.
The satellite at Lafroth has special rules. When claiming the route between Lafroth and Quastrippe, if the claiming player has a cruiser on the route, they may choose to assign the cruiser to a position on the satellite. The player may choose any position for which they have the appropriate level of environmental technology.
5c. Scoring during a claim. Every player who has control of a planetary system adjacent to a route being claimed gains one victory point. Control of a system is defined as the majority of ships on planets in that system, and if there is a tie for majority, then control is awarded to the player with the right-most colony on the planet. It doesn't matter which player claims the route; victory points are always awarded to the controller (or controllers in the case where two planetary system on the route are controlled by someone.)
5d. Take a booster. If there is a booster associated with the route being claimed, the claiming player takes the booster into their possession, and draws a replacement booster from the stack. Replacement boosters are placed back on the playing board at the end of the player's turn. A booster can be replaced onto any empty road where there is at least one empty planet in a planetary system adjacent to the route. To replace a booster, first click on the booster. It will flip over to reveal what type of booster it is. Then click on the route or flashing booster position indicator to place it. The booster will automatically be oriented with the yellow star pointing toward the route to which it is attached.
6. Boost. If you have a booster in your possession, you may use it any time before you end your turn. Most boosters do not require using an action, so you can play a booster even after you have used all of your actions. Because of this, whenever you have a playable booster in your possession, you must manually end your turn by pressing the End Turn button when you are out of actions. The capabilities of each booster is described below:

6a. Remove 3 Ships Booster. When this booster is used, the player clicks on 3 opponent's ships on routes. These ships are returned to the owner's ship yard.

6b. Improve Any Technology Booster. When this booster is used, the player clicks on a ship on any technology track on their tableau. This ship is moved to ship yard, and the player may immediately use the technology at the new improved value. If this increases the player's number of actions, they even get an extra action during the current turn.

6c. Additional 3 Actions. When this booster is used, the player immediately take another 3 actions.

6d. Additional 4 Actions. When this booster is used, the player immediately take another 4 actions.

6e. Switch Booster. This booster allows a player to switch adjacent colonies. Environmental technologies and ship type requirements can be ignored. A colony placed with an Extra Colony Booster may not be the target of a switch.

6e. Extra Colony. This is the only booster that requires a user to have an action to use. This booster can only be used on a route that has at least 1 colonized planet at the end of the route. Use of the extra colony booster initiates a claim action. After the route is claimed, the player must colonize a planet, and the colonization ship will be placed to the left of the left-most planet. This extra colony is counted toward the majority when determining control of a planetary system.
Scoring
Victory points come in two categories: in-game points, and post-game points.
In-game points are tallied as they occur and include the following:
When the game is over, you add the in-game points to the post-game points to determine the final score. Click on the Details link in the scoring area to see your score break-down.
In-game points are tallied as they occur and include the following:
- 1 point per planetary system owned during a claim action.
- 1 point per ringed-planet colonized
- 7 points for being the first player to colonize planets in any combination of planetary systems connecting the two red nebula.
- 4 points for being the second person to connect the nebula
- 2 points for being the third person to connect the nebula
- 2 points for every controlled planetary system
- Commerce technology points for every colony in your largest network of connected planetary systems.
- 4 points for each technology track completely cleared (except the Commerce track)
- Face value points for every cruiser on the bonus satellite area.
- 1 point if you own 1 booster
- 3 points if you own 2 or 3 boosters
- 6 points if you own 4 or 5 boosters
- 10 points if you own 6 or 7 boosters
- 15 points if you own 8 or 9 boosters
- 21 points for 10 or more boosters
When the game is over, you add the in-game points to the post-game points to determine the final score. Click on the Details link in the scoring area to see your score break-down.
End of Game
The end of game is triggered immediately if any of the conditions below are met. The active player does not even get complete their current turn.
- Any player scores 20 in-game points.
- Any player needs to draw a booster, but cannot because the stack is empty.
- There are 10 or planetary systems with no room for additional colonies
Strategy Tips
Hansa Teutonica is a deep strategy game with many interesting subtleties. You may discover deeper and deeper strategies every time you play. In the beginning it's easy to get overwhelmed with all the possibilities of play and lose focus on scoring points. Here are a few good tips to get you started.
- Do whatever it takes to improve your action technology at least once. This will give you 3 actions.
- Block your opponents frequently on routes next to technology improvement satellites and bonus markers. You will frequently get chased out of these positions, but don't be discouraged, this is a good thing. Being chased means you get to add ships to the board, which you can then jump around to take better positions and score points.
- Try getting a large network. A network is any set of colonies in adjacent planetary systems. Try getting network of 4, 5, 6 or even more ships. Remember, two ships in the same planetary system is a network of 2, so you don't even have to spread out very far to get a large network.
- Read the All Things Teutonica strategy guide for even more tips.
